MAKE | Spooktacular Marshmallow Pops
Oh we do love a reason to celebrate and eat more sweets than is medically advised. And that, though not the only reason, is why we love Halloween. There is something nostalgic about the holiday and, at Sass & Belle, we feel as though we revert back to our childhood. The pumpkin carving, preparing your costume, trick or treating, or even a night in watching your favourite spooky movie: all of these playful activities contribute to why Halloween is one of our favourite times of the year! To get prepared and in the mood for spooks we have got an extremely simple and fun activity which will make the perfect sweet treat for you or your guests. It involves lots of candy and is an enjoyable recipe to make. We hope you have as much fun making these as we did!
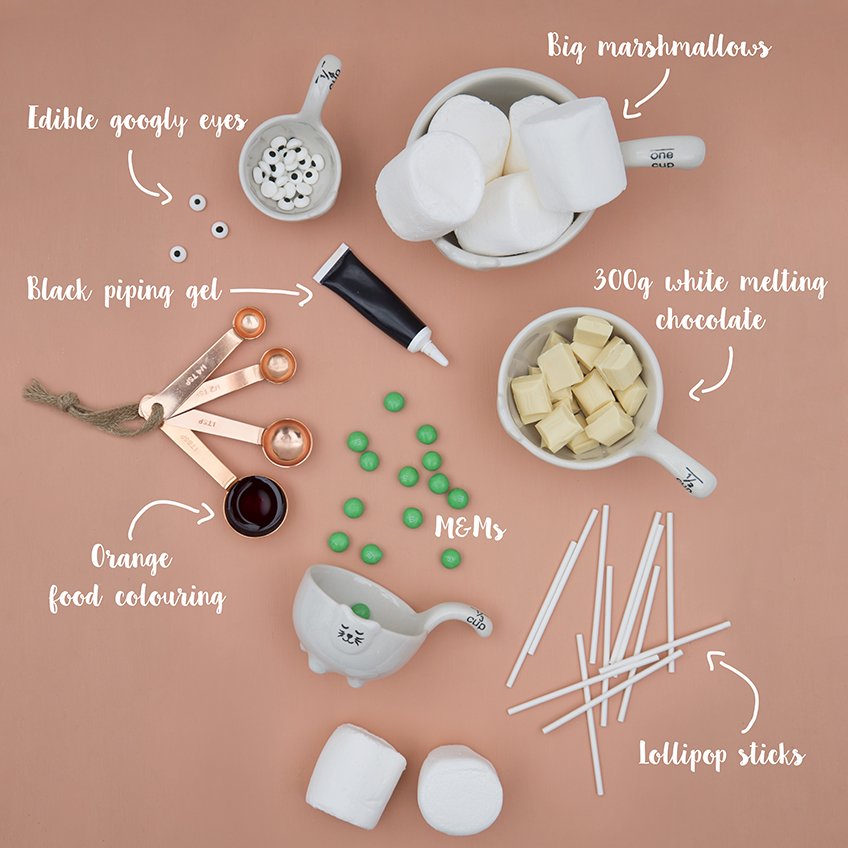
You will need:
- Big marshmallows
- Edible googly eyes (we bought ours here)
- Lollipop sticks (Hobby Craft do a variety)
- Black piping gel
- 300g white melting chocolate
- Orange food colouring
- M&Ms
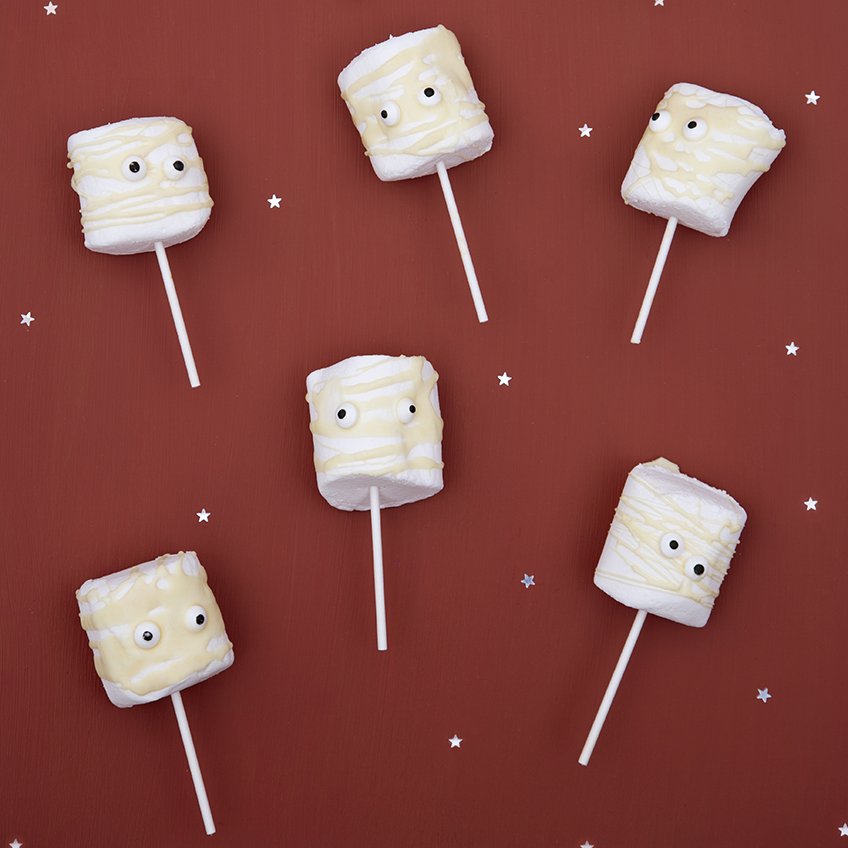
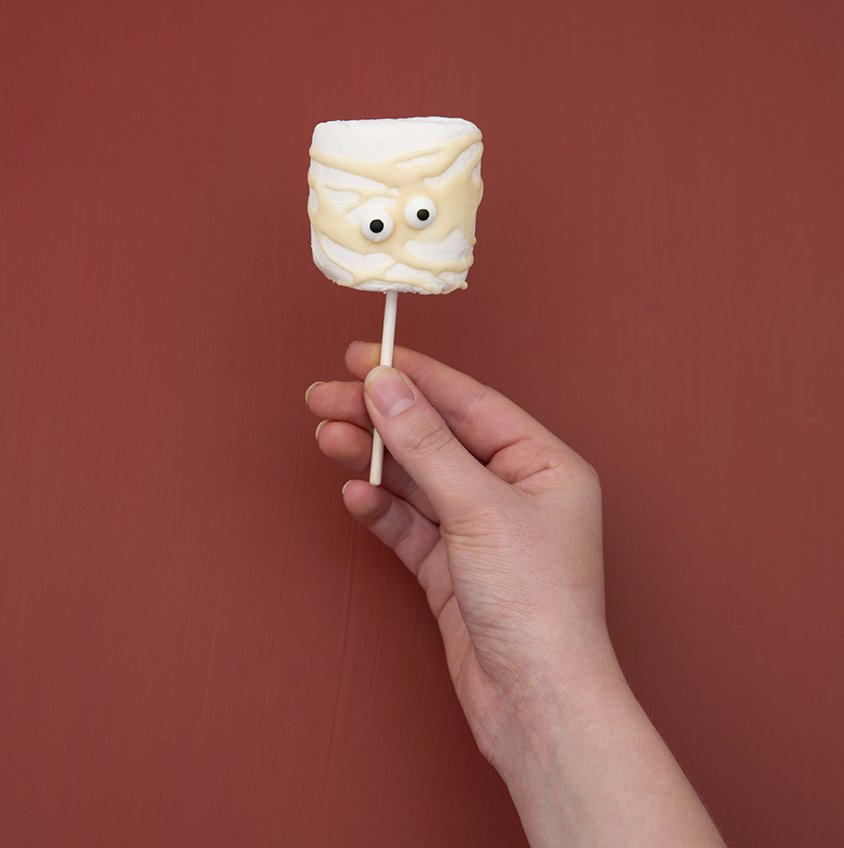
Steps for the mummy marshmallow pops
- Select the marshmallows you wish to mummify and prop them up, sticking in the lollipop stick in the bottom.
- Lay them out flat on a chopping board, or on a space where you don’t mind it getting a bit messy and drizzled in chocolate.
- Break up the white chocolate and into little cubes. Using a microwavable bowl, pop roughly 50g/100g (depending on how many you’re making) in the microwave.
- Melt chocolate in the microwave for 30 second intervals until it is melted and of a single cream consistency.
- Taking a teaspoon, drizzle white chocolate across the mummy pops. Swoop horizontally from high up. This is to create the bandages affect. You can really have fun with this so make sure you do!
- Before the chocolate has dried, get your googly eyes and put in place on the chocolate. The melted chocolate will act as an adhesive. Once in place, hold down for 5 seconds to ensure they stick. We found the wonkier the eyes, the more character it gave the mummies.
- Leave to dry!
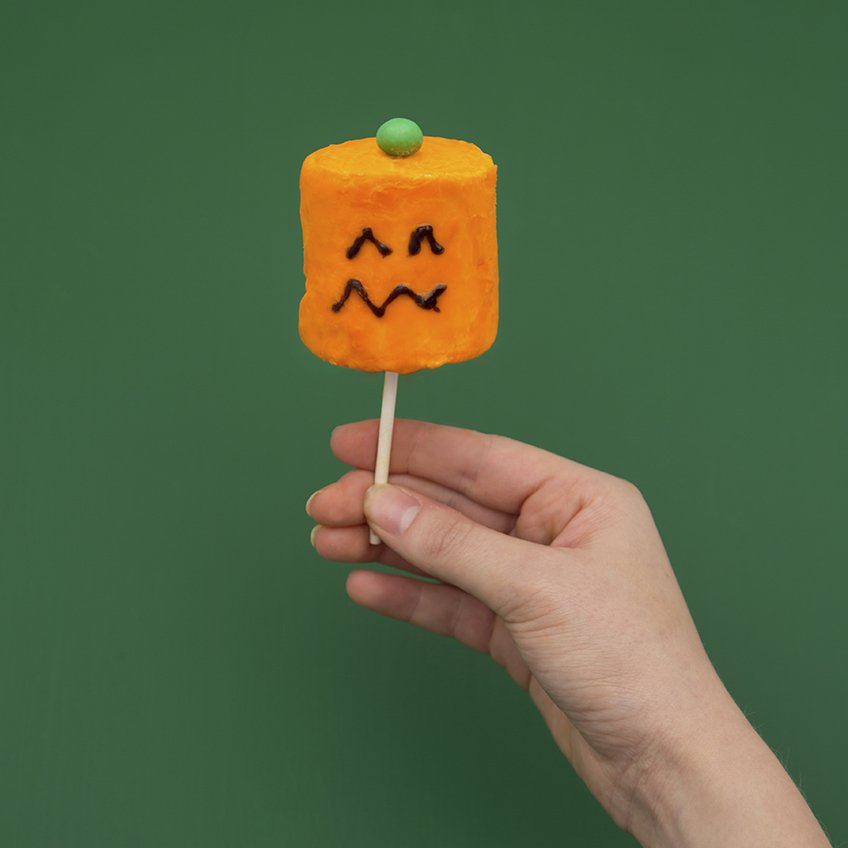
Steps for pumpkin marshmallow pops
- Follow step 1 above.
- Break up the white chocolate and into little cubes. Using a microwavable bowl, pop roughly 150g in the microwave.
- Melt chocolate in microwave for 30 second intervals until it is melted and of a single cream consistency.
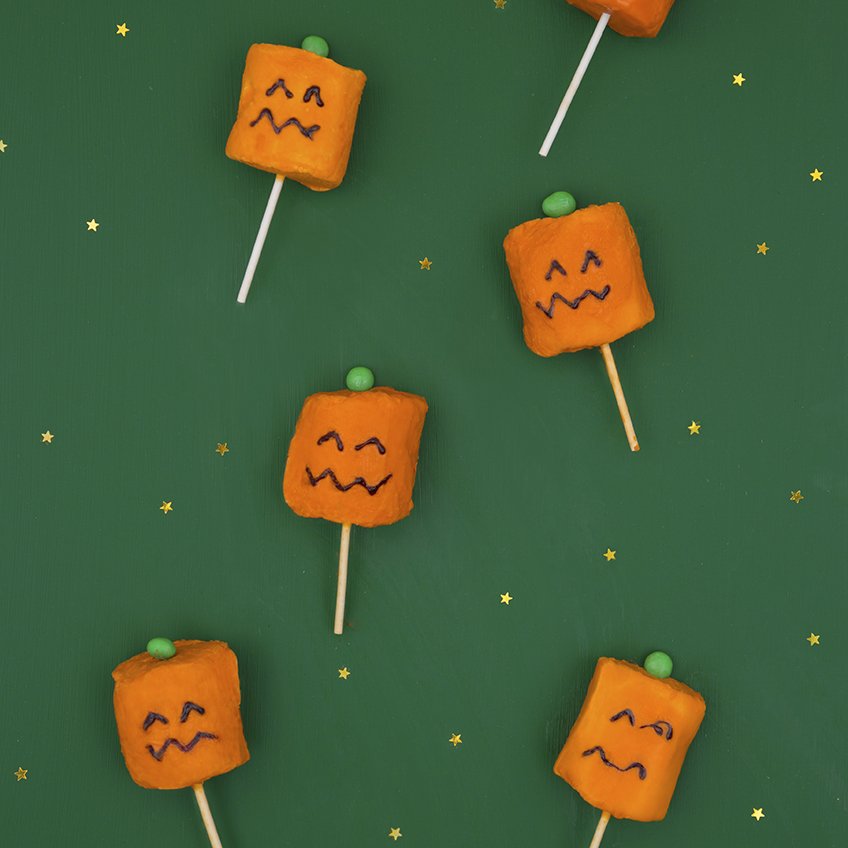
- Add in drops of orange food colouring. Gage how bright you want your pumpkins to be and add the colouring accordingly. Please note, the food colouring thickens the melted chocolate so you should add drops of water to get the mixture to a consistency which you can spoon.
- Taking a spoon, cover the marshmallow in the mixture.
- Before it dries, take a green M&M and pop on the top of the marshmallow, holding down to ensure it sticks.
- Leave to dry for 2 hours.
- Once dried draw on a mouth and eyes with the black gel.
There you have it! Fun Halloween treats that will bring a smile to your face when prepping and eating. We’d love to see what you come up with so make sure you use the hashtag #SassandBelleHalloween on Twitter, Instagram, or Facebook. Don’t forget to tag @sassandbelle!

BAKE | Fantastic Flamingo Cake

We are very excited right now, for so many reasons. Firstly because, today The Great British Bake Off will be back on our screens. There is no TV programme we love quite like GBBO. Mary Berry and the clan are as comforting as tucking into a slice of Victoria Sponge. It inspires us to bake in a way that no other cookery show has done before it. For that, we are eternally grateful. Another reason we’re rather ecstatic is because we have our very first guest blogger showing us how to bake *the prettiest cake we’ve ever seen*! The lovely Eboni, from EBONI + IVORY also shows us an extremely easy Pink Lemonade recipe – another thing we’re eternally grateful for (you can see why we’re a little over excited.) Now you’ve heard what’s in store, we imagine you are a bit too! Read on to discover how to bake pretty with Eboni…

Hey Guys,
I am Eboni, from EBONI + IVORY Blog. Lovely to meet you! Today’s post is a little bit special and a lot-le bit exciting!! It is a “How-to” Flamingo Cake and Pink Lemonade. This month Sass & Belle and I have teamed up to bring you a fabulous food post celebrating the Tropical Flamingo Summer products and The Great British Bake Off returning to our screens! So, we’ve all heard the saying “Third time’s a charm”? Well, I’m inclined to universally change this saying to “FIRST time’s a charm”! Because this is the first time Sass & Belle have collaborated with a Guest Blogger and the first time I have ever made this cake! I must admit, the process of making this Flamingo cake was not always smooth sailing (although we never got as heated as that Baked Alaska, Bake Off disaster) but I like to think that all the mistakes I made, will be mistakes that you won’t have to make! (Like that positive twist? ;) OK, without further ado, LET’S GET BAKING!
You will need:
- 450g unsalted butter, very soft
- 450g caster sugar
- 2 teaspoon vanilla extract
- 8 large eggs
- 400g self-raising flour
- 50g cornflour (note you can use an additional 50g self-raising flour instead)
- 4-5 tablespoons milk
- Pink food colouring
For the icing – (this is a basic guide; you may end up using more or less depending on your taste)
- 280g/5oz butter, softened
- 560g/10oz icing sugar
- 2-3 tbsp milk
- Pink food colouring
- Pink edible glitter for decoration (optional)
Equipment
- Mixing bowl
- Weighing scale or measuring cups
- 2 x 21cm sandwich tins (about 5cm deep), buttered
- Measuring spoons
- Electric whisk
- Wooden spoon/spatula (Sass & Belle have some cute ones)
- Piping bag
- Long palette knife (or similar)

Method
- Preheat the oven to 180C / gas mark 4. If the tins are loose-bottomed, you don't need to line them, otherwise do.
- Cream 225g of butter and 225g of sugar, add 1tbs of vanilla and 4 eggs, one at a time, adding a spoonful of flour between each (only use 200g of flour at this point). Fold in 25g of the cornflour and when all incorporated, add a little milk as you need.
- Now the fun bit! Add a generous amount of the pink food colouring to create a pink batter - My top tip would be “more is less”! Be generous with your colouring for a brighter pink (but remember to save some for the icing!)
- Pour and scrape the batter into the tins and bake for about 25 minutes, until the cakes are beginning to come away at the edges, are springy to the touch on top and a cake tester comes out clean.
- Leave the cakes in their tins on a wire rack for 10 minutes before turning out and leaving to cool completely.
- Repeat the process using the leftover ingredients to make the third and fourth layers.
Advanced technique
You may want to add a little more of the pink colouring to the second batch to darken the colour of the layers and create an ombre effect.

Ombre Icing
- Beat the butter in a large bowl until soft.
- Add half of the icing sugar and beat until smooth.
- Add the remaining icing sugar and one tablespoon of the milk and beat the mixture until creamy and smooth.
- Beat in the milk, if necessary, to loosen the mixture.
- Ok, you should now have a smooth, creamy, fairly stiff butter cream icing mix.
- You are going to add a little of the pink food colouring to create a pale pink. Use this between the cake layers to create your tower. (If your layers are different colours, stack them light to dark for the ombre effect. Or, you could stack them “light, dark, light, dark”, as I have done).
- Now use the piping bag to pipe blobs of icing on the top of the cake and around the sides of the first cake layer.
- You can now add a little more of the pink food colouring to darken the shade of the icing and pipe in blobs around the sides of the second cake layer.
- Repeat this process of darkening and blobbing down the fourth cake layer.
- Take the palette knife and gently smooth the blobs to create a sleek ombre effect.
- My top tip would be to use a piece of kitchen towel in your other hand to wipe off the excess icing that you will scrape away.
- There may be some air pockets that you can just smooth over with a little butter knife or teaspoon.


Decoration
This is my fave bit! Time to show off your art-skills and jazz up your flamingo cake!
- I sprinkled edible pink glitter on the top of the cake. I also sprinkled a little bit at the top of the sides to create a “dripping crystals” effect.
- I also found some Flamingo cocktail sticks to top off the cake in a party theme.
And there you have it! Your Fantastic Flamingo Cake! Perfect for a summer party or birthday!

After all that baking and flamingo fun, you may be thirsty! Perfect time to make a juicy thirst-quencher in the best colour!
Quick Pink Lemonade

You will need:
(For 2-3 glasses)
- A large handful of raspberries
- Cranberry/Raspberry juice
- Sparkling lemonade
- 1 lemon
- Ice
- Mint to taste (optional)
- Fun decorations
- And of course, some sassy tropical glasses
Method
- Fill half the glass with the cranberry/raspberry juice and top up with sparkling lemonade.
- Squeeze 3-4 raspberries to allow the juice to escape and drop into the glass.
- Add a couple of mint leaves for a refreshing twist.
- Add your fun decorations. I have used an umbrella, flamingo and palm tree sticks and some bright stirrers.
- Add ice just before serving.
Advance technique: Turn your Quick Pink Lemonade into a boozy dream “Pink Mojito” by adding a little white rum, lime and a sprig of mint!

Thanks for joining me for this fun post! And thank you to Sass & Belle for having me as your first guest blogger!
I hope your bakes are going well and if you do give the Flamingo Cake or Pink Lemonade a go, I would love you to send me pictures via Twitter: @ebonidixon. You can find more about me over on my blog EBONI + IVORY. I post regularly about lifestyle, fashion, beauty and travel.
Love Eb x

DECORATE | Wildflower Wedding Table

Our Sass & Belle original Wildflower Collection is utterly dreamy. Celebrating the individual blossom, it features delicate illustrations which create a romantic pattern. Because of the romantic nature of the print, these items from the collection are perfect for wedding displays. Taking inspiration for wildflowers, we’ve created a wedding table using our favourite pieces from the range. We want to give you a bundle of ideas for setting tables and event displays, and bring the loveliness that is the Wildflower collection to life! So without further do, let’s get cracking…

Individual lavender
As we’ve already mentioned, the Wildflower collection celebrates the fragile nature of the individual flower. A blossoms details becomes the focus: the petals, the stem, the array of colours found in one singular floret. Honouring this type of flower makes a change from the preened and large bouquets you often see taking pride of place at wedding tables. There is something quite beautiful about the untended garden and the wildness of flowers that grow in abundance. Wildflowers remind us of summer evenings and the English countryside, and so they are particularly fitting if you’re having a wedding in the summer, or in the countryside. Scattering wildflowers around the table with little touches, here and there, will look charming. Lavender is stunning, not only for its distinctive fragrance, but because, whether it’s dried or fresh, it adds a pop of colour. Try placing a stem or two in a napkin tied with twine. The smell of lavender as your guests sit at the table will be delightful, and the understated yet romantic look is fuss free with maximum impact.

Bunches of lavender
Now we don’t mean to contradict ourselves. After waxing lyrical about the individual blossom, we’re actually going to suggest you bring a rather large bunch into the mix as well. But hear us out! A bouquet of wildflowers, or a plant, looks wonderful with a mix of single flowers. Wildflowers aren’t often evenly distributed, and so it looks really effective having a mix of different sizes and colours. You want them to match in the best possible way, but the core of this look is that it isn’t too contrived. The whole look of wildflowers is that they are accidentally beautiful, if that is such a thing? To really nail the look, you want to ensure that the plants you display are wild. Check with your local florist if you’re unsure, or our old friend Google can be pretty helpful too!

A sweet quote
You may or may not have gathered, but at Sass & Belle we are fans of a quote or two. Whether it’s motivating, inspiring, or so lovey-dovey it makes your heart flutter, you can be certain that we will be a fan. So, it will come to no surprise to you that we suggest you scatter some across the table. We’ve gone for flower quotes because we do love a theme. You can, however, go for any quote that takes your fancy or has sentimental meaning to you. Make it pretty, stick it in a frame and viola!

Plenty of simple vases
Going back to flower distribution, one way to add impact to your table is by scattering it with simple vases, filled with wild blossoms. This creates an understated charm, while ensuring that there are pops of colour.

Statement decoration
Nothing says love like statement love letters! These decorative items look incredible scattered across the space. When creating a display its always worth thinking about different heights and depths. Something like our three-tiered suitcases are fantastic for adding height, as decorations can be placed on each level. Think about the shapes of your table and how you can think outside of the box shape to create an eye-catching spectacle.

A thoughtfully wrapped gift
Offering your guests a little gift with their dinner has become a tradition. In fact, favours are becoming more and more of a ‘thing’. There is no denying that a present is exciting, whatever your age or the occasion. What is also worth considering, is that when a gift is wrapped, it’s a little more exciting than when it’s open. The art of wrapping and unwrapping a gift is, well, an art! So why not excite your guests and add impact to your table by wrapping up presents? You can add ribbon and tags for extra prettiness.
So there you have our tips and tricks on how to make your wedding table a wildflower heaven. We would love to see your own wedding table displays, so don’t forget to tag @sassandbelle on Twitter, Instagram and Facebook in all your pictures. Happy table dressing!


