Spooktacular Marshmallow Pops
18/10/2016 10:15
Oh we do love a reason to celebrate and eat more sweets than is medically advised. And that, though not the only reason, is why we love Halloween. There is something nostalgic about the holiday and, at Sass & Belle, we feel as though we revert back to our childhood. The pumpkin carving, preparing your costume, trick or treating, or even a night in watching your favourite spooky movie: all of these playful activities contribute to why Halloween is one of our favourite times of the year! To get prepared and in the mood for spooks we have got an extremely simple and fun activity which will make the perfect sweet treat for you or your guests. It involves lots of candy and is an enjoyable recipe to make. We hope you have as much fun making these as we did!
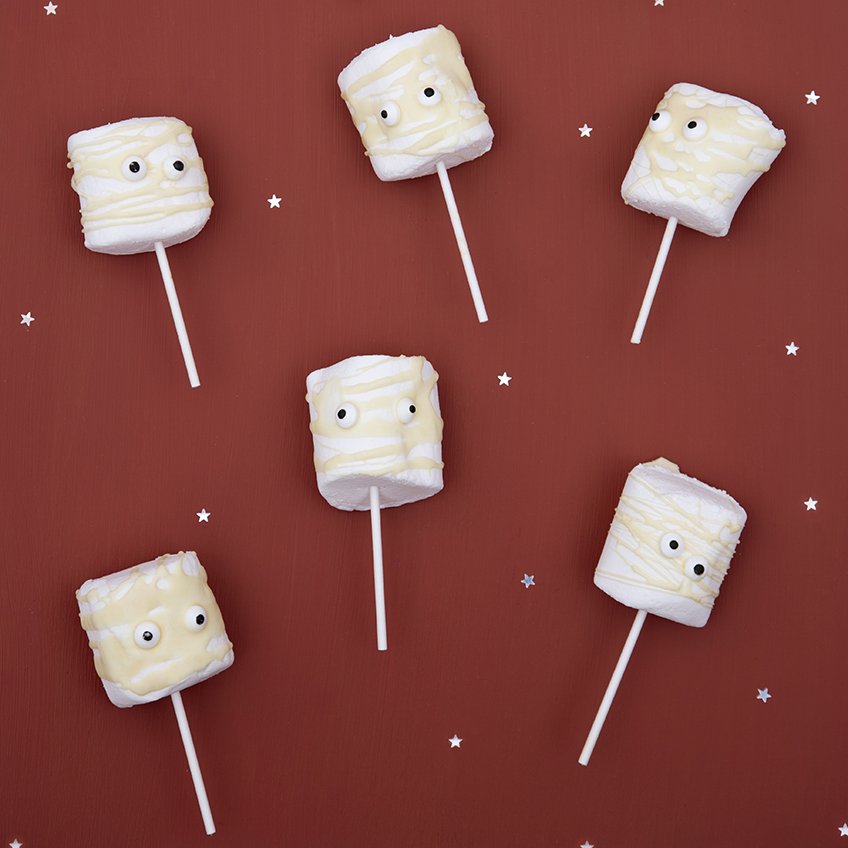
Today we are getting Halloween ready by making Marshmallow mummy and pumpkin pops. Made from marshmallows, these pops require no baking or cooking, just decorating. Which, let’s be honest, is definitely the best bit!

You will need:
- Big marshmallows
- Edible googly eyes (we bought ours here)
- Lollipop sticks (Hobby Craft do a variety)
- Black piping gel
- 300g white melting chocolate
- Orange food colouring
- M&Ms
Steps for the mummy marshmallow pops
- Select the marshmallows you wish to mummify and prop them up, sticking in the lollipop stick in the bottom.
- Lay them out flat on a chopping board, or on a space where you don’t mind it getting a bit messy and drizzled in chocolate.
- Break up the white chocolate and into little cubes. Using a microwavable bowl, pop roughly 50g/100g (depending on how many you’re making) in the microwave.
- Melt chocolate in the microwave for 30 second intervals until it is melted and of a single cream consistency.
- Taking a teaspoon, drizzle white chocolate across the mummy pops. Swoop horizontally from high up. This is to create the bandages affect. You can really have fun with this so make sure you do!
- Before the chocolate has dried, get your googly eyes and put in place on the chocolate. The melted chocolate will act as an adhesive. Once in place, hold down for 5 seconds to ensure they stick. We found the wonkier the eyes, the more character it gave the mummies.
- Leave to dry!

Steps for pumpkin marshmallow pops
- Follow step 1 above.
- Break up the white chocolate and into little cubes. Using a microwavable bowl, pop roughly 150g in the microwave.
- Melt chocolate in microwave for 30 second intervals until it is melted and of a single cream consistency.
- Add in drops of orange food colouring. Gage how bright you want your pumpkins to be and add the colouring accordingly. Please note, the food colouring thickens the melted chocolate so you should add drops of water to get the mixture to a consistency which you can spoon.
- Taking a spoon, cover the marshmallow in the mixture.
- Before it dries, take a green M&M and pop on the top of the marshmallow, holding down to ensure it sticks.
- Leave to dry for 2 hours.
- Once dried draw on a mouth and eyes with the black gel.

There you have it! Fun Halloween treats that will bring a smile to your face when prepping and eating. We’d love to see what you come up with so make sure you use the hashtag #SassandBelleHalloween on Twitter, Instagram, or Facebook. Don’t forget to tag @sassandbelle!